Wednesday 29 June 2011

Salmon teriyaki with paksoi and kohlrabi

A culinary experiment and product of the month combined in one message. We do now how to blog efficiently. ;) Actually I want to discuss 2 ingredients of the month: kohlrabi and paksoi. During my exam period, I've 'experimented' twice with paksoi and it turns out to be an all-round vegetable. As regards kohlrabi: it was one big mystery for me: I haven't eaten it before, I haven't prepared it yet. I didn't know anything about it. Until now...

Paksoi

Paksoi used to be an exotic vegetable. Originally from the oriental countries this cabbage is now popular in many wok dishes. Nowadays paksoi is grown in Belgium and other European countries as well. It combines excellently with punchy ingredients like ginger and chili and has a sweet, spinach-like taste. And it turned out that you can experiment a lot with it, because it can be cooked in different sorts of dishes.
First, I made a paksoi and leek mash and it had a refined and delicious taste! Just season it well with pepper, salt and nutmeg and you get a lovely mash.
My second dish was a tabbouleh with paksoi, field salad, garlic and ras-el-hanout (an oriental spice mix). This tasted well too, but the subtle taste of the paksoi was dominated by the robust spice. Not the best combination though.

Kohlrabi

The great mystery in my teriyaki dish was this grass green tuber crop. It's a member of the cabbage family and has a spicy, radish-like taste. It goes very well in summer salads. I tried to use it along with paksoi in a wok dish.
It's unnecessary to remove the leaves because they contain most of the vitamins of the kohlrabi. The inside is quite soft and you can slice them in small cubes or slices and just stir fry them without parboiling it first.


This is my ingredient list (for 3 persons):

- 3 fresh fillets of salmon
- 1 small kohlrabi
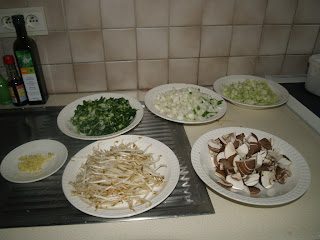
- 1 paksoi (with the green leaves too)
- 100 g shiitake mushrooms (or chestnut mushrooms)
- 100 g soy bean sprouts
- some fresh ginger
- 3 tb. soy sauce
- 1 tb. rice wine
- 2 tb. sesame oil
- 1 tb. cane sugar
-peanut oil to stir fry
- some sesame seeds and fresh coriander for the finishing


  • Slice the salmon in 3 cm pieces. Season them a little with pepper. 
  • Make the teriyaki marinade: mix the soy sauce, sugar, rice wine and sesame oil into a smooth sauce. Marinate the slices of salmon into it for 15 minutes.
  • Then, prepare the vegetables: chop the paksoi and the kohlrabi into tiny cubes, slice the mushrooms into small slices and chop the ginger and the green paksoi leaves very thin.
  • Next, heat some peanut oil in a frying pan and stir fry the vegetables one by one. Start with the kohlrabi, when it's cooked but still crispy, put them out of the pan and add the paksoi. do this with all the vegetables.
  • In the mean time, bake the slices of salmon an a separate pan (to avoid they become sticky in the frying pan) until their almost ready. Put aside.
  • When the last vegetable is frying (normally the mushrooms), add all the others, add the teriyaki sauce in which you marinated the salmon.
  • Let cook for about 1 minute and gently add the salmon to the vegetable mix.
  • Finish with extra sesame seeds, freshly chopped coriander leaves and serve with Japanese udon noodles.
  • Enjoy your meal!


The result was a powerful wok dish in which the spicy taste of the kohlrabi goes well with the crispy soy bean sprouts and paksoi. I must warn you though: if you're not very fond of the typical flavour of radish, you maybe don't like the kohlrabi in this recipe.


Macarons: Part III

This will become the last episode for now. I'm about to travel to the Balkan for three weeks so it's more likely that this blog will be updated with savory, stew-like dishes than with fancy French macarons. :) But before my departure I wanted to exercise a little more on the tiny sweets.

With the third try coming, I was quite more experienced than in the beginning and now I can distinguish between a 'good' and a 'bad' macaron recipe. The egg - broyage ratio is very important and too much broyage in comparison with your egg-whites can ruin the batter gravely. So I tried to find a balance ...
Another fault I made the first times was the fact that I didn't beat my meringue enough. It's important that you get a stiff dough so the macarons won't collapse instantaneously.
Another tip: separate your egg-whites 24h before you make the macarons. This does something (good) to the structure of the egg. 
This are the ingrediƫnts I used:

- 110 g powdered sugar
- 110 g almond powder
- 50 g granulated sugar
- 110 g egg whites

Easy to memorise! An equal amount of egg white, sugar and almond powder.
First I made my French meringue. I slowly battered the whites in a bowl, added the granulated sugar step by step and mixed the whole until stiff.
Then I blended the powdered sugar and the almond powder so all was mixed homogeneous.
Next, I slowly putted the meringue in the broyage until the whole became a sticky dough. I squirted them onto baking powder in tiny rounds:

The consistency was much better then the my first tries! It seemed that these would become 'good' macarons'. Unfortunately the shells didn't harden after about 1 hour, so I putted them into the oven (15 min's on 150°) like this. The result looked much ore like a real macaron.
After three attempts I have to conclude that building up experience is very important in macaron-making. If you exercise a lot, one day all the pieces of the puzzle fit in and out comes a real crunchy macaron!
Enough for a few weeks as regards this chapter. But please continue reading this blog! And if someone can give me the 'golden tip' for macing the perfect macarons, please comment. :)

Cheers,

Thomas

Saturday 18 June 2011

Macarons: Part II

Welcome back for a new episode of my macaron adventures. If you missed the first part: I've wrestled with piping bags, escaped a kitchen battlefield and finally found something that looked like a macaron. For my second attempt I wanted to be much better prepared than the first time. And that's what I did...


Since a few months we're subscribed to a digital TV network and one of the brand new channels was the new Belgian cooking channel Njam!. One of the programs seemed especially handy for my quest: 'Roger Van Damme Desserts' in which the eponymous chef prepares really tasty culinary versions of some classic  puddings. In one of the shows he focused on the macaron; Yes!
After some rigorous preparations (I went to the shop for additional almond powder and some cooking coloring) I tried to memorize the recipe as good as possible.
Before I could start I encountered some problems: there is some kitchen equipment needed I didn't have: a food processor, a cooking thermometer and an anti-sticking coaster. Problem? I did it my way, baby. :)
This is how it goes:

Ingredients:
broyage/grinding
200 g almond powder
200 g powdered sugar
110 g egg white

Italian meringue
110 g egg white
150 g granulated sugar
40 g water

First, make the 'broyage' (which is a mixture of almond powder and powdered sugar) by stirring the dry ingredients together. Then sift it as good as possible until the mix feels dusty.
After this prepare the 'Italian meringue'. The intention is making sugar water, cooking this until 180° and then pour it to the egg white that is getting stirred in the food processor. Because I didn't have this equipment, I beat the egg whites and added the water when I thought it was ready. Bad idea! :) I couldn't batter my egg white stiff. Making patisserie is exact science, that's sure.
Anyway, the next step is blending this meringue carefully under the broyage at which you first add the rest of the (non-beaten) egg white. Add some cooking coloring if you want.
Because I couldn't make proper circular macarons I decided to fill the whole area of the oven plate with the batter. The next step is (if everything passes according to plan :) ) letting the mixture rest for 45 minutes so the macarons can form a small crust. Of course this didn't happen with my 'huge macaron'. I even waited an hour...
Finally I baked the whole at 150° for 15 minutes.

The result was much better than the first time but I need to get more experienced.
To be continued...

Friday 17 June 2011

Resto Review: Ristorante Arlecchino

Ristorante Arlecchino is one of the oldest Italian restaurants in Hasselt. When I walked past it and looked at the menu, I realized this was not the average spaghetti-with-prefab-bolognese-sauce shack. Firstly, because they have an official quality label from the Italian government! Only when you work with authentic Italian products, and prepare your meals according to the rules of Italian cooking art, you're eligible for this label.
Secondly: the chef has -as one of the few European(!) cooks- three of its own recipes in 'The Silver Spoon', the bible for Italian cooking fanatics worldwide.
The dining room is designed in an elegant way in orange -and red-coloured tints. The female waiter was polite and not pushy, something me and my company appreciate. As a starter we got a tasty lobster bisque with a foam of tomato, which tasted really good.
The menu was really extensive and I couldn't choose between the flavourous-looking dishes, which contained a lot of ingredients I really like (risotto, squid, artichoke, ...). Finally, I chose for some real Italian standards: Spaghetti con vongole and Ossobuco alla maniera dello chef Mario.
The vongole was extremely savoury, because the chef had boiled the pasta in a little bit of the cooking juice of the clams. Indeed: according to the rules of Italian cooking art. Such bursts of flavour with so few ingredients (just spaghetti, clams and tomato did the trick!).
Then, it was time for my Ossobuco. Just on time, I realized I ordered some extra spaghetti with it as a side dish, while he said I could get rice with it too. The 'rice' in my messmates dish turned out to be a creamy risotto so I changed my mind and ordered 'rice'. And indeed: my Ossobuco was served 'the Milan way': with risotto, marrow and saffron! The meat was butter soft and the sauce was really well-balanced in terms of spices. Again: made the proper Italian way.
A pity though that my dish was really too full. I got a huge stack of risotto and a huge peace of meat. No room for dessert ...
Conclusion: the chef knows how to prepare a proper Italian meal. You could feel the love for his native country in his dishes and that's how it's supposed to be.
Interested? Visit their website.

Cheers.

Macarons: Part I

Good evening everybody. My first real cooking related post on this blog is a fact! As I said before I wanted to learn making macarons and that's what I did. Fully armed with a recipe by the famous chef Sergio Herman, I got started.
First I must say that I didn't have an idea about what the exact ingredients of a macaron are and in my search for recipes I encountered a load of different approaches to making macarons. So why not getting inspired by one of our best chefs?
To be honest, my first attempt was not good. My kitchen looked like a battlefield during the preparations . Working neatly is a must when you're cooking!
First I separated the egg whites from the yolks and putted them in a bowl. Then I beated the eggs with the powdered sugar until they had the texture and consistency of bath foam. Then I added the almond powder, the flour, the grated coconut and a whiff of vanilla extract and stirred until I got a compact mass. Thereafter this batter was cast in a piping bag. And there it went wrong. Piping bags don't seem to like me because I always mess up when using them. :)
The problem was that the batter was too runny and therefore I never could have made circular macarons. As good as it got I made circular macarons on an oven plate (with baking paper on it of course) and baked them for about 20 minutes in a 165° preheated oven.
This was the result:

I filled them with a chocolate & raspberry ganache. This is the final result:

Taste: like a rather compact and dense cookie, it tasted like a sort of shortbread
Consistency: granular, with a rough, pocked surface
Overall comment: After some research on the internet, I figured out that what I made was not the typical French macaron ('macaron de Paris'), but -what the English call- a 'macaroon'. The difference lies in the ingredients: macaroons are much heavier sorts of biscuits with flour and grated coconut. French macarons are extremely airy and smooth meringue-like pasties.

What have we learned today?

1) There are macarons and there are macar(o)ons
2) Organisation and preparation is very important
3) Making macarons can be disheartening (but don't give up!)

With some new knowledge gained my next attempt couldn't go wrong. During my search I ended up with another heavyweight of Belgian cuisine: Roger Van Damme. The man who made 'The Best Dessert in the World' a few years ago can't be wrong.